Example of using Google map
This example describes how to add a Google map in a library component and use it in JDashboard.
Creating a library component with a Google map
- Open the catalog file SampleReports.cat.
- Click File > New > Library Component on the menu bar.
- In New Library Component dialog, clear the text in the Library Component Title box, select Blank, and then click OK.
- Drag Google Map from the Toolbox panel to the library component. The Create Google Map wizard appears.
- In the Data screen of the wizard, select WorldWideSalesBV from Data Source 1. Then click Next.
- In the Group screen, add the fields Region and Country in the Customers table as the group by fields one by one.
- Skip the Filter screen and go to the Layout screen directly. In the Layout screen, click Browse to locate the
<install_root>\gisinfo directory, and then select the file GeoData.xml in the directory, click Open to import the XML file. Then click Next.
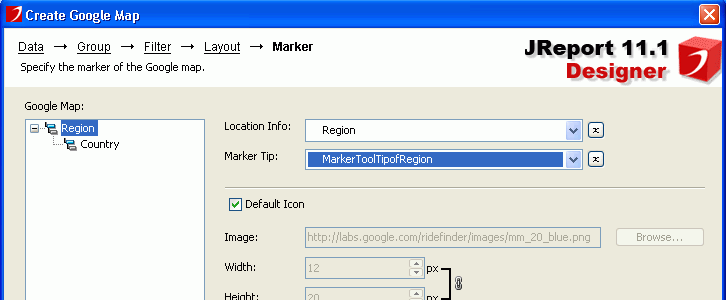
- In the Marker screen, select the Region group level from the Google Map box, then click
 beside the Location Info text field and select Region from its drop-down list.
- Click beside the Marker Tip text field, then select <Create Formula> from its drop-down list to create a formula to control the marker tip information.
- In the Input Formula Name dialog, enter the name MarkerToolTipofRegion and click OK.
- In the Formula Editor window, define the formula as follows.
"Region:"+" "+@"Customers.Region"+"\r\n"+

"Total Sales:"+" "+"$"+ToText(@"Orders Detail.Total Sales")
- Save the formula and close the Formula Editor. MarkerToolTipofRegion will be displayed in the Marker Tip text field.
- Select the Country group level in the Google Map box, then repeat the above steps to select Country for Location Info, and create another formula MarkerToolTipofCountry as follows to control its marker tip information.
"Country:"+" "+@"Customers.Country"+"\r\n"+

"Total Sales:"+" "+"$"+ToText(@"Orders Detail.Total Sales")
- Keep the default settings for other options in the Marker screen and click Finish.
- Select the Contents node in the Report Inspector, then set its Height property to 3.75, and Width to 5.3.
- Click File > Save to save the library component as Sales Map.lc.
Adding conditional formats to the Google map markers
After a Google map is created, each group level is bound with a marker. You can add some conditional formats to its markers, then when a specified condition is fulfilled, the format bound with the condition will be applied to the markers automatically for distinguishing the different sales amounts by country.
- Right-click the Google map and select Conditional Formatting from the shortcut menu.
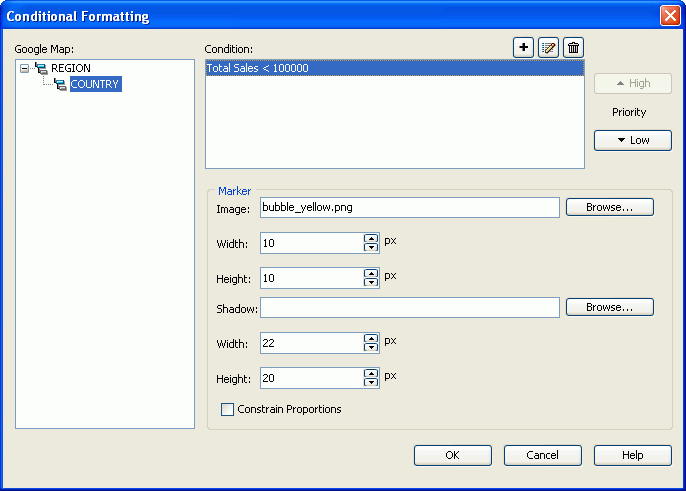
- In the Conditional Formatting dialog, select Country from the Google Map box, then click
 above the Condition box.
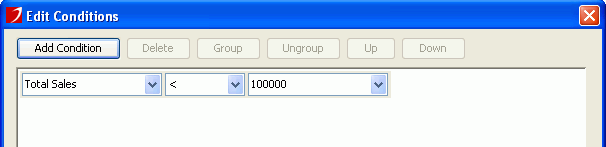
- In the Edit Conditions dialog, click the Add Condition button to add a new condition line and specify the condition as
Total Sales < 100000.
- Click OK to return to the Conditional Formatting dialog.
- In the Marker box, click Browse beside the Image text field and select bubble_yellow.png in the current catalog for the marker. Uncheck Constrain Proportions and set both Height and Width for the image to 10 pixels. Delete the default shadow image in the Shadow text field.
- Click to add a condition as
Total Sales >= 100000 And Total Sales < 400000. Then in the Marker box, select bubble_red.png in the current catalog as the image for the marker, set both Height and Width for the image to 20 pixels, and delete the default shadow image.
- Click to add a condition as
Total Sales >= 400000 And Total Sales < 600000. Then in the Marker box, select bubble_orange.png in the current catalog as the image for the marker, set both Height and Width for the image to 25 pixels, and delete the default shadow image.
- Click to add a condition as
Total Sales >= 600000 And Total Sales < 800000. Then in the Marker box, select bubble_purple.png in the current catalog as the image for the marker, set both Height and Width for the image to 30 pixels, and delete the default shadow image in the Shadow box.
- Click to add a condition as
Total Sales >= 800000 And Total Sales < 1000000. Then in the Marker box, select bubble_blue.png in the current catalog as the image for the marker, set both Height and Width for the image to 35 pixels, and delete the default shadow image in the Shadow box.
- Click to add one more condition as
Total Sales >= 1000000. Then in the Marker box, select bubble_green.png in the current catalog as the image for the marker, set both Height and Width for the image to 50 pixels, and delete the default shadow image.
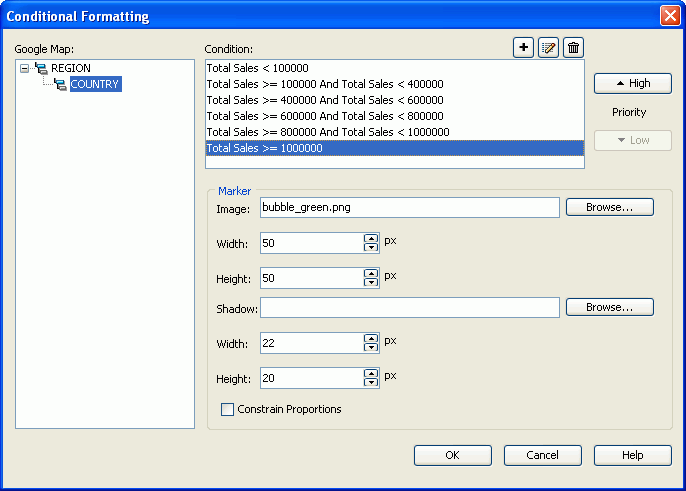
- Click OK to save the conditional formats and leave the dialog.
Displaying the Google map in JDashboard
- Publish the library component to the default location on JReport Server together with the resources used by it.
- Start JReport Server and access the JReport Console page.
- On the JReport Console > Resources page, click New Report > Dashboard. A blank dashboard will be created.
- Click
 on the side bar to display the Resources panel.
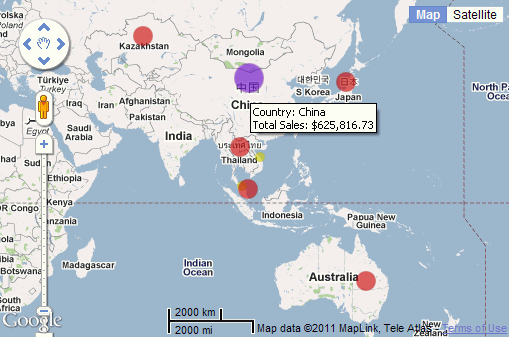
- Browse to find the library component Sales Map.lc in the Component Library node and then drag it to the destination in the dashboard body. You can see the formats we defined in the Conditional Formatting dialog are applied to the markers, and when you hover the mouse on a marker, its tip information will also be displayed just as we defined.

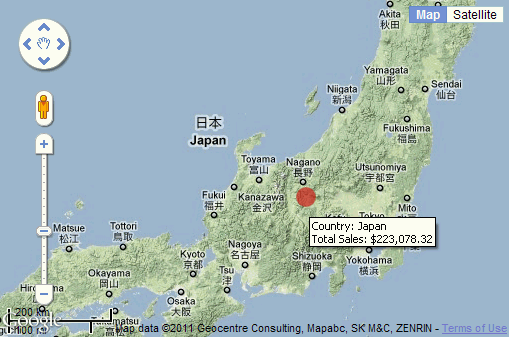
- In this Google map component, there are two group levels, first by Region and second by Country. For the higher group level, you can perform the go-down action, and for the lower group level, you can do the go-up action. Hover your mouse over the marker Region APAC, right-click it, and select Go Down from the shortcut menu, then the Google map will jump one group level down to show the information of countries in the APAC region.
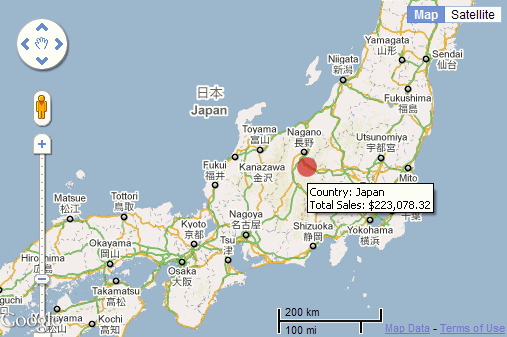
- You can use the tools on the left side of the Google map to move the map up/down/left/right and make it zoom in/out. Besides, you can also double-click or right double-click the Google map to make it zoom out or zoom in. Double-click the Google map four times to locate the Japan area as follows:
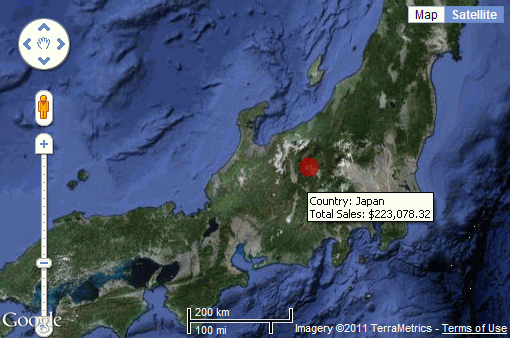
- Click Satellite on the top right of the Google map to make it displayed with satellite type.
- Click Map on the top right of the Google map and then click Terrain to make it displayed with terrain type.