

Example of delivering a message
This example demonstrates how to deliver a filter user defined message between two library components. It is divided into the following steps:
- Create two library components.
- Define to deliver a filter user defined message between the library components.
- Publish the library components to JReport Server.
- Deliver the message in a dashboard.
Creating the library components
- Open the catalog SampleReports.cat.
- Use the business view WorldWideSalesBV to create two library components and save them as Component 1.lc and Component 2.lc.
For Component 1, create a table which displays the Country, Customer Name and City DBFields, is grouped by Region, and uses Total Sales as the summary field. For Component 2, create a crosstab using Country and Region respectively as the row and column fields, and Total Sales as the summary field.
Defining to deliver a filter user defined message
After creating the two library components, you can define to send a filter user defined message on Component 1 and to receive the message on Component 2, then the message can be delivered between the two library components when a specified event occurs after they are published into JReport Server and inserted into a dashboard.
To define to send a filter user defined message on Component 1:
- Right-click the group by field Region and select Display Type from the shortcut menu to bring out the Display Type dialog.
- In the Web Behaviors box, select Click as the trigger event from the drop-down list in the Events column and then click
 in the Actions column.
- In the Web Action List dialog, select *SendMessage and click OK. The Send Message - Web Action Builder dialog appears.
- Select User Defined as an event to trigger from the Message drop-down list. Then input 1001 and Filter - Region as the message ID and name.
- Click
 to add a message line.
- Select Input from the drop-down list in the Key column and input Region in the text box.
- Select Current Value from the drop-down list in the Value column. String is dispalyed automatically in the Data Type column. Then you can see the detailed information about the user defined message in the box below.
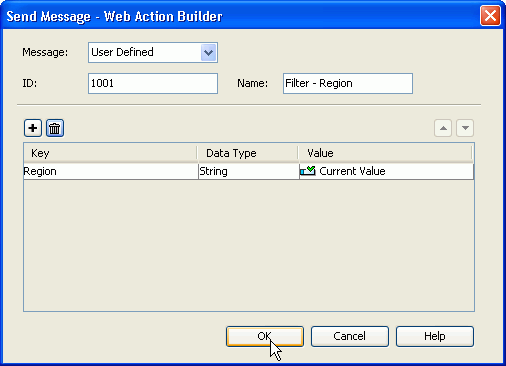
- Click OK in this dialog and then OK in Display Type dialog to define to send out the message.
To define to receive a filter user defined message on Component 2:
- Right-click the crosstab and select Receive Message from the drop-down list to display the Receive Message dialog.
- Click to add a message line.
- Select Input from the drop-down list in the Message ID column and input 1001 in the text box.
- Input Filter - Region in the text box of the Message Name column.
- Click in the Actions column to display the Web Action list dialog. Then select *Filter and click OK to display the Filter dialog.
- Select Region from the Filter On drop-down list and Input under the Message Key icon in the Value drop-down list and input Region in the text box. Then you can see the detailed information about the filter action.
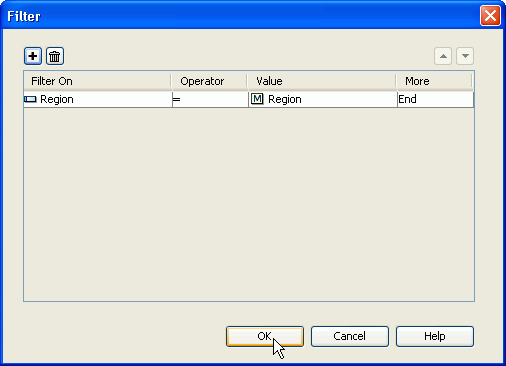
- Click OK button to go back to the Receive Message dialog. Here you can see the filter action Component 2 will do when it receives the message sent out by Component 1 in a dashboard.
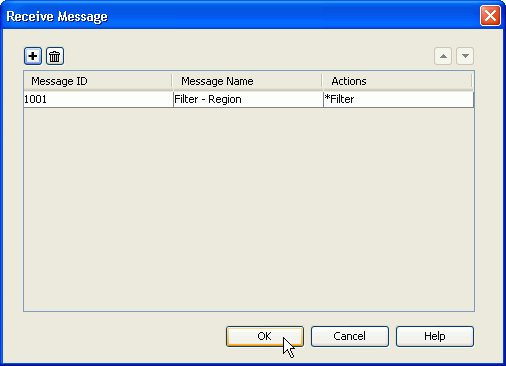
- Click OK button to define to receive the message.
Publishing the library components
After defining how to deliver the message, save the two library components. Then, start JReport Server and publish the library components along with the catalog SampleReports.cat to the component library in JReport Server. For detailed steps about publishing resources from JReport Designer to JReport Server, see Publishing resources remotely.
Delivering the filter user defined message in a dashboard
When the two library components are inserted into a dashboard, when the Click event occurs on the region group by field in the table, the message will be delivered between them, and the records in the crosstab will then be filtered according to the specified condition.
To deliver the message in a dashboard:
- Open the JReport Console page, select New Report > Dashboard in the Reports tab to create a dashboard.
- Open the Components panel and browse to the folder where the two library components are published.
- Drag and drop the two library components to the dashboard.

- Click the region APAC in the table in Component 1 to send out the filter user defined message, then you can see how the crosstab in Component 2 is filtered after it receives the message.
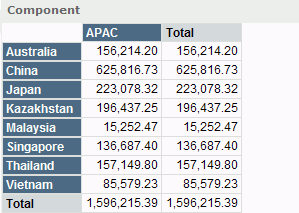
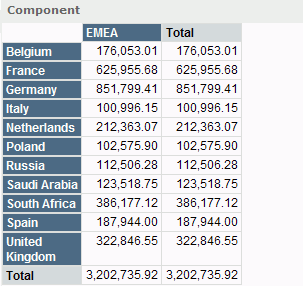
- Turn to Page 7 and click EMEA in the table, then you can see the records about this region is displayed in the crosstab.
- You can also click other regions to see the records about each region.